
Vegetables
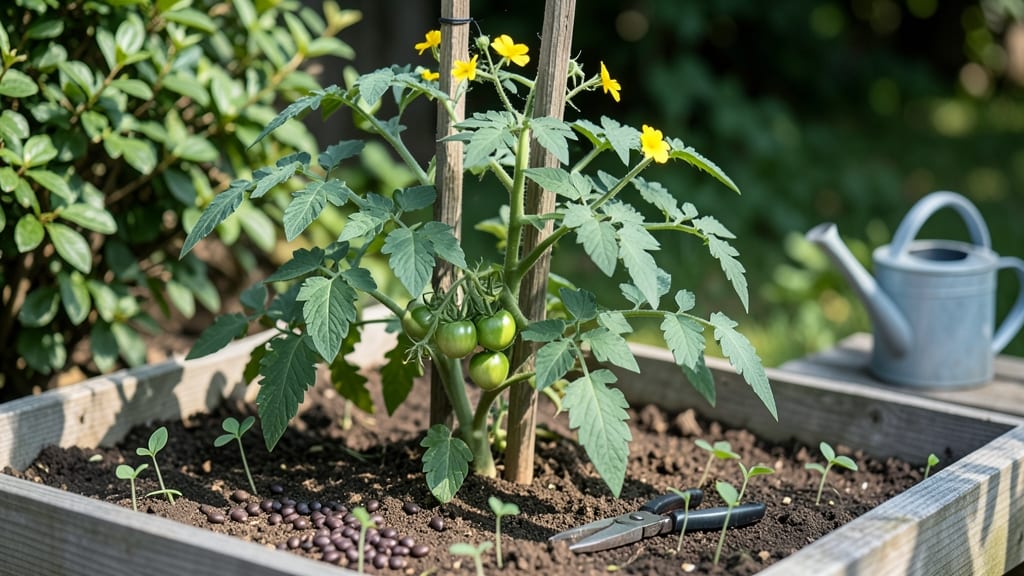
Planting beans with tomatoes isn’t just clever—it’s a game-changer for your garden’s productivity. 🌱 I learned this trick after watching my tomato plants struggle in depleted soil, and once I paired them with beans, both thrived like never before.
The beans fix nitrogen in the air, feeding the tomatoes right where they need it most, while the tomatoes provide shade that keeps beans cool and productive.
This combo works best with pole beans climbing alongside indeterminate tomatoes, but bush beans tucked at the base also help. You’ll need 3-4 feet of space between tomato plants and 6-12 inches between bean rows, depending on variety.
Start tomatoes first—4-6 weeks before last frost—then add beans 2-3 weeks later when soil warms to 60°F. The beans will scramble up tomato stakes or trellises, creating a living support system.
By mid-summer, you’ll harvest sweeter, more abundant tomatoes thanks to the beans’ natural fertilizer, while the beans produce more pods than they would alone. The tomato leaves also protect beans from overheating, and the two plants deter pests like aphids that target either alone.
It’s like having a built-in garden ecosystem that works harder for you.
Fair warning: you’ll need to monitor trellis stability as beans grow heavy, and mulch generously to keep moisture up for both plants. But the payoff—double the harvest in the same space—makes it worth every extra minute. Ready to try this foolproof pairing?
📚 In This Guide
- What you need
- Instructions
- Tips and common mistakes
- Wrapping up and next steps
What you need
- ● Seeds: 50–100 pole bean seeds (e.g., Scarlet Runner, Kentucky Wonder, or Blue Lake)
- ● 3–5 tomato plants (determinate varieties like Roma, Celebrity, or Bush Early Girl—avoid sprawling indeterminate types)
- ● Soil: 1 bag of compost (2–3 cubic feet) or well-aged manure
- ● 1 lb of balanced fertilizer (10-10-10) or organic options like bone meal + kelp meal
- ○ Optional: 1 lb of wood ash (for calcium, especially for tomatoes)
- ● Garden Space: A 6–8 ft wide × 4–6 ft long raised bed, in-ground plot, or container (minimum 12" deep)
- ● If using containers: 5-gallon buckets or large pots (1 per tomato plant)
- ● Hand trowel or transplanting spade
- ○ Garden gloves (optional but recommended!)
- ● Watering can or hose with a gentle spray nozzle
- ● Stakes or 3–4 ft tall trellis (for beans—bamboo or metal works great)
- ● Mulch (straw, grass clippings, or leaves to retain moisture)
- ● Pruning shears (for tomato maintenance)
- ● Sunny spot with 6–8+ hours of direct sunlight daily
- ● Well-draining soil (amend with compost if your soil is heavy/clay-like)
- ● Access to water (beans and tomatoes need 1–2 inches of water per week)
- ● Patience! Beans take 50–60 days to mature; tomatoes 60–85 days depending on variety.
Step-by-Step instructions for planting beans with tomatoes
This classic companion planting method boosts yields and naturally repels pests—here’s how to set it up right.
🌱 Step 1: Prepare the Planting Site for Tomato Roots
Tomatoes need deep, well-draining soil with plenty of organic matter. Before planting, loosen the soil to a depth of 12 inches using a broadfork or tiller. Work in 2-3 inches of compost (from your materials list) and a handful of bone meal to encourage strong root development. Tomatoes are heavy feeders, so this early boost prevents nutrient deficiencies later.
Here’s the thing—don’t overwork the soil. You want it loose but not powdery. Press down lightly with your hands to create a firm base for the roots. If your soil drains poorly, mix in 1 inch of perlite to improve aeration. The goal is soil that holds moisture but doesn’t stay soggy—tomatoes hate wet feet.
🪴 Step 2: Plant Tomato Seedlings at the Right Depth
Set tomato seedlings in the ground so that only the top third of the stem remains above soil level. This encourages stronger root growth along the buried stem. Space plants 18-24 inches apart in rows 3 feet apart to allow airflow and prevent disease. If you’re using cages or stakes, install them now to avoid disturbing roots later.
Water deeply right after planting to settle the soil around the roots. You’ll see the soil surface firm up slightly—that’s your signal the roots are making contact. Avoid wetting the leaves, as this can spread fungal diseases. Instead, water at the base until the soil is 6 inches deep and evenly moist.
🌿 Step 3: Plant Bean Seeds Alongside Tomatoes
Beans are the perfect nitrogen-fixing companion for tomatoes. After planting tomatoes, create shallow 1-inch-deep trenches between the rows, about 6 inches from each tomato stem. Drop 3-4 bean seeds per trench, spaced 2 inches apart. Cover lightly with soil—beans need light to germinate, so don’t bury them too deeply.
Water gently to keep the soil surface moist but not saturated. Beans germinate quickly, usually within 5-7 days, so keep the soil consistently damp until you see the first true leaves. The beans will climb the tomato plants naturally, but if they need support, weave small twine between the plants as they grow. This creates a living trellis that saves space and improves airflow.
☀️ Step 4: Maintain Moisture and Mulch for Success
Spread 2-3 inches of straw mulch around the base of both plants, leaving a 2-inch gap around the stems to prevent rot. Mulch conserves moisture, suppresses weeds, and keeps soil temperatures stable—critical for both tomatoes and beans. Water deeply 2-3 times per week, aiming for 1 inch of water per week, and adjust based on rainfall.
Watch for signs of stress: tomato leaves that curl or yellow signal underwatering, while wilting bean leaves mean it’s time to water. This system works because beans fix nitrogen in the soil, which tomatoes love, while the tomato foliage provides shade for beans on hot days. It’s a win-win that reduces the need for synthetic fertilizers.
✂️ Step 5: Prune and Harvest for Maximum Harmony
As the plants grow, prune tomato suckers (the small shoots that form in the leaf axils) to direct energy to fruit production. Leave the beans to climb freely—they’ll twine around the tomato stems naturally. When tomatoes begin to ripen, harvest them regularly to encourage more production. Beans will be ready to pick in 50-60 days, depending on the variety.
Here’s where it gets fun: the beans will continue fixing nitrogen in the soil even after harvest, benefiting any remaining tomatoes. At the end of the season, let the bean plants decompose in place—they’ll add organic matter back to the soil. This method not only boosts yields but also builds healthier soil over time.
Tips & tricks for perfect three-sister garden harmony
Between us, this companion planting method is a game-changer—but only if you nail the details. Here's what nobody tells you about creating that perfect symbiotic relationship.
Soil Preparation Secret: When loosening that 12-inch depth in Step 1, think of it like fluffing a pillow—you want it airy but not powdery. I've seen gardeners over-till and create a compacted mess below. Instead, use a broadfork to break up the soil while leaving the structure intact. The 2-3 inches of compost should be mixed just enough to create pockets of fertility, not a uniform blend. This creates ideal conditions for those deep tomato roots while keeping the soil loose enough for beans to establish quickly.
Planting Depth Technique: That "top third above soil" rule in Step 2 is non-negotiable for tomato seedlings. I learned this the hard way after planting too deeply and watching roots struggle to establish. For extra insurance, make a small mound of soil when planting, then press the stem lightly against it before covering. This creates better contact with the soil. And here's the thing about spacing—18-24 inches apart might seem generous, but it prevents fungal diseases by ensuring proper airflow between plants, which is especially critical in humid climates.
Bean Germination Strategy: In Step 3, those 5-7 days for bean germination can feel like an eternity when you're waiting. The key is maintaining consistent moisture without saturation. I've found that using a fine mist setting on your watering can creates the perfect environment. Pro tip: place a small piece of clear plastic over the trenches immediately after planting—it creates a mini greenhouse effect that can speed germination by 1-2 days while keeping pests at bay. Just remove it once you see sprouts.
Mulch Application Insight: That 2-3 inches of straw mulch in Step 4 isn't just for looks—it's a crucial moisture regulator. I've seen gardeners skip this step and end up with dry soil that cracks, preventing proper water absorption. The secret is to spread it evenly but leave that 2-inch gap around stems to prevent rot. For extra weed suppression, add a thin layer of newspaper under the straw—it blocks light while allowing water to penetrate. This double-layer system keeps weeds at bay for months.
Pro Tips for Planting Beans With Tomatoes
- Between us, this companion planting method is a game-changer—but only if you nail the details.
- Soil Preparation Secret: When loosening that 12-inch depth in Step 1, think of it like fluffing a pillow—you want it airy but not powdery.
- Planting Depth Technique: That "top third above soil" rule in Step 2 is non-negotiable for tomato seedlings.
Frequently asked questions
Got questions about growing beans and tomatoes together? You’re not alone! Here are answers to the most common queries about this dynamic duo in your garden.
Can beans and tomatoes grow together in containers?
Both thrive in containers as long as they have enough space—beans need at least 12 inches of depth, while tomatoes require a 5-gallon pot minimum. Use a well-draining mix, and place them near a trellis or cage to save space. Just avoid overcrowding, as competition for nutrients can stress both plants.
When is the best time to plant beans with tomatoes?
Plant beans after the last frost when soil reaches 60°F (15°C), but tomatoes need a slightly earlier start. Begin tomatoes indoors 6-8 weeks before the last frost, then transplant them outdoors after hardening off. Sow beans directly into the soil 2-3 weeks after transplanting tomatoes to avoid chilly soil shocking the beans.
Will planting beans with tomatoes attract more pests?
Not necessarily! Beans actually repel some tomato pests like aphids and whiteflies thanks to their nitrogen-fixing roots. However, watch for Mexican bean beetles or tomato hornworms—both may target both plants. Handpick pests early or use row covers for prevention. Companion planting still wins over chemical sprays!
What if my tomatoes aren’t doing well near beans?
Check for common issues: overwatering (beans hate soggy roots), nutrient imbalance (add compost or balanced fertilizer), or shade competition (beans grow fast!). If tomatoes look stressed, prune bean vines to improve airflow. If problems persist, try spacing them farther apart or growing beans in a separate pot nearby.
Are there better companions for tomatoes than beans?
Beans are a fantastic choice, but other winners include basil (repels pests), onions/garlic (deter disease), and marigolds (deter nematodes). Avoid planting tomatoes with brassicas (like cabbage) or potatoes, as they compete for resources or attract similar pests. Experiment to see what thrives in your microclimate!
Wrapping up and next steps
Planting beans with tomatoes is a game-changer for small gardens—it boosts yields, saves space, and creates a thriving ecosystem! 🌱 By embracing the Three Sisters method, you’re not just gardening; you’re building a sustainable, high-performing team of plants.
Whether you’re a beginner or a seasoned grower, this approach makes harvesting easier and more rewarding.
Ready to grow your confidence and your harvest? Start small—try a single bed this season—and watch your garden flourish. Next, explore companion planting with other veggies or dive into soil amendments to take your yields even further! 🌟