
Vegetables
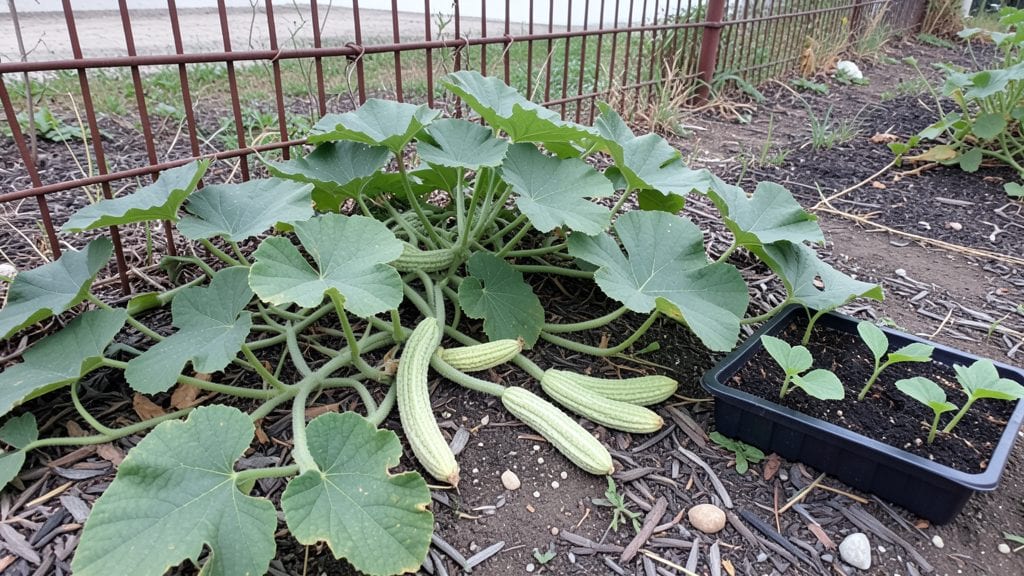
Planting ridge gourds transforms even a tiny balcony into a lush, vine-covered harvest factory. 🌿 I’ve grown these fast-climbing gourds in 4x4-foot containers, and they produce more than my sprawling backyard garden ever did—with half the space.
The secret? Trellising them early and giving them just the right amount of sun and water.
You’ll need a sturdy trellis or fence (6 feet tall works perfectly), well-draining soil mixed with compost, and a warm spot that gets at least 6 hours of sunlight daily.
Ridge gourds thrive in zones 6-11, but even in cooler climates, they’ll climb and produce if you start seeds indoors 3-4 weeks before your last frost. The vines grow aggressively—expect 10-20 feet of growth per season!
By mid-summer, you’ll be harvesting tender young gourds (great for stir-fries) and watching the vines turn into the famous luffa sponges by fall. The plants are drought-tolerant once established, but keep soil consistently moist while they’re young.
Prune side shoots to encourage upward growth and more fruit production—your neighbors will be jealous of that vertical green wall.
Even beginners nail this—just don’t overcrowd the vines, and watch for powdery mildew in humid climates. A quick spray of neem oil keeps them healthy. Ready to turn your small space into a gourd-growing powerhouse?
📚 In This Guide
- What you need
- Instructions
- Tips and common mistakes
- Wrapping up and next steps
What you need
- ● Ridge gourd seeds: 5–10 seeds (or 2–3 seedlings if transplanting). Choose disease-resistant varieties like Pariyar or Tinda.
- ● Potting mix or garden soil: 10–15 lbs (4.5–7 kg) of well-draining, compost-rich soil (pH 6.0–6.8). Mix in 20% coco peat or vermiculite for aeration.
- ● Containers or garden bed: Containers: 5–10 gallon pots (1 with drainage holes per plant) or fabric grow bags.
- ● Garden bed: 3’x3’ space per plant (or trellis-supported rows for vertical growth).
- ● Trellis or stakes: 6–8 ft bamboo stakes or a mesh trellis (ridge gourds are vining!).
- ● Watering can or hose: With a gentle spray nozzle (ridge gourds hate soggy roots!).
- ● Fertilizer: Organic: 1 cup compost or worm castings per plant (at planting + every 3 weeks).
- ● Synthetic: Balanced 10-10-10 fertilizer (1 tbsp per plant, monthly).
- ● Mulch: Straw or shredded leaves (2–3 inches thick) to retain moisture.
- ● Seedling heat mat (if starting indoors in cool climates).
- ● Pruning shears (to trim excess vines and encourage fruit production).
- ● Neem oil or copper fungicide (for pest/disease prevention).
- ● Soil moisture meter (to avoid over/under-watering).
- ● Garden journal (to track planting dates, harvests, and tips!).
Step-by-step instructions for planting ridge gourds
Here’s how to grow these vining wonders in small spaces—no sprawling trellises required.
🌱 Step 1: Choose the Right Spot and Prep the Soil
Ridge gourds thrive in full sun (at least 6-8 hours daily) and warm soil. Pick a location with well-draining soil—they hate soggy roots. If your soil is heavy clay, mix in 2-3 inches of compost from your materials list to loosen it up. I like to work this in a 12-inch wide band where the vines will spread.
Before planting, run your fingers through the soil. It should feel crumbly, like a damp sponge—not sticky or gritty. Ridge gourds are sensitive to cold, so wait until the soil reaches at least 65°F before sowing. A soil thermometer helps here, but I’ve also learned to trust my thumb: if it feels warm to the touch, it’s ready.
🌿 Step 2: Plant Seeds or Transplants at the Right Depth
If starting from seeds, plant 2-3 seeds per mound (since germination isn’t always perfect). Press them ½ inch deep into the soil, spacing mounds 3-4 feet apart—this gives vines room to sprawl without crowding. For transplants, dig holes just deep enough to bury the root ball, then firm the soil gently around the base.
Here’s the thing—I’ve seen beginners plant too shallow, which exposes seeds to drying out. Cover them with a ¼-inch layer of soil, then water lightly to settle everything. If using transplants, water deeply right after planting to eliminate air pockets around the roots. You’ll know it’s right when the soil looks evenly moist but not muddy.
☀️ Step 3: Provide Support Early and Water Consistently
Ridge gourds are climbers, but they don’t need fancy trellises. Instead, I use bamboo stakes or a simple wire mesh (like chicken wire) to guide them upward. Install support right after planting—vines grow fast, and waiting means tangled messes later. Secure the top of the stake with twine or zip ties, leaving 4-5 feet of air space for the vines to climb.
Water deeply 2-3 times per week, aiming for 1-1.5 gallons per plant at each session. The key is keeping the soil evenly moist but not soggy. You’ll see new leaves appear within 7-10 days—that’s your cue everything’s on track. If the soil feels dry 1 inch below the surface, it’s time to water again.
✂️ Step 4: Prune and Harvest for Continuous Production
Once vines reach the top of their support, pinch off the main stem to encourage bushier growth. This isn’t mandatory, but it boosts fruit production. I also remove any yellowing or diseased leaves immediately—ridge gourds are susceptible to powdery mildew in humid climates, and early action prevents outbreaks.
Harvest when gourds are 6-8 inches long and still firm to the touch. Use pruning shears to cut the stem, leaving ½ inch of attachment. This encourages the plant to produce more fruit. I’ve found that harvesting every 5-7 days keeps the plant focused on new growth rather than letting a few gourds monopolize its energy.
🪴 Step 5: Extend the Season with Simple Tricks
For year-round harvests, use black plastic mulch (from your materials) to warm the soil in spring and retain heat in fall. This lets you plant 2-3 weeks earlier and extend the season by 4-6 weeks. In cold climates, I also cover young plants with frost cloth on chilly nights—ridge gourds are tropical and won’t tolerate frost.
When temperatures drop below 50°F at night, harvest any remaining gourds and store them in a cool, dark place (like a basement). They’ll keep for 2-3 weeks, giving you fresh produce even in winter. The secret? Don’t wash them before storing—just brush off dirt and let them dry completely first.
Tips & tricks for perfect ridge gourd planting
These simple tricks will help you maximize your harvest and troubleshoot common growing challenges with ease.
The Sunlight Factor: Ridge gourds need that full sun (6-8 hours daily) to thrive, but not all locations get equal sunlight. If your garden has partial shade, position the plants where they get the most direct sunlight possible. I’ve seen plants in partial shade produce smaller gourds, so consider using a portable grow light for 2-3 hours in the morning if needed. This ensures your plants get the energy they need for vigorous growth.
Soil Temperature Secret: Waiting for soil to reach at least 65°F is crucial, but how do you know when it’s ready? I’ve found that sticking a thermometer in the ground at the planting depth (about 2 inches down) gives the most accurate reading. If you don’t have one, try the thumb test: press your thumb into the soil—if it feels warm to the touch, it’s time to plant. Cold soil can stunt growth and delay germination.
Support System Strategy: Installing support right after planting (as mentioned in Step 3) prevents tangled vines later, but here’s a pro tip: use stakes that are slightly taller than your expected vine height. I’ve found that 6-foot stakes work perfectly for most compact gardens. This gives your vines room to grow without constantly adjusting supports. Also, secure the stakes firmly—they’ll be holding up heavy gourds later!
Watering Wisdom: The 2-3 times per week watering schedule is ideal, but timing matters too. Water in the morning so the leaves have time to dry before evening. This helps prevent fungal diseases like powdery mildew, which ridge gourds are prone to. I also recommend using a drip irrigation system or soaker hose to deliver water directly to the roots, keeping the foliage dry. This method also ensures consistent moisture without overwatering.
Pro Tips for Ridge Gourd Planting
- These simple tricks will help you maximize your harvest and troubleshoot common growing challenges with ease.
- The Sunlight Factor: Ridge gourds need that full sun (6-8 hours daily) to thrive, but not all locations get equal sunlight.
- Soil Temperature Secret: Waiting for soil to reach at least 65°F is crucial, but how do you know when it’s ready?
Frequently asked questions
Got questions about growing ridge gourd? You’re not alone!
Here are answers to the most common concerns—from timing to troubleshooting—so you can confidently grow this versatile vine in your compact garden.
When is the best time to plant ridge gourd?
Ridge gourd thrives in warm weather, so plant seeds after the last frost (when soil temps hit 70°F/21°C) or start indoors 4–6 weeks before transplanting. In mild climates, you can even grow it year-round with row covers! For cooler areas, wait until summer.
How long does it take for ridge gourd to mature?
Expect a harvest in 60–90 days after planting, depending on variety and conditions. Young fruits (3–4 inches) are tender and best for cooking, while larger ones (6+ inches) can be stored longer. Pro tip: Pick regularly to encourage more production!
Can ridge gourd grow in containers or small spaces?
Ridge gourd is a space-saving vine—train it up a trellis or let it sprawl in containers (10+ gallons). Just ensure it gets 6+ hours of sun daily and prune excess vines to boost fruit size. Perfect for balconies or patios!
What pests or diseases should I watch for?
Common issues include aphids, powdery mildew, and fruit rot. Prevent pests with neem oil or companion planting (try marigolds!). For mildew, improve airflow and avoid overhead watering. Fix it fast: Remove infected leaves immediately to stop spread.
How do I store harvested ridge gourd?
Store uncut gourds in a cool, dry place (50–55°F/10–13°C) for up to 2 weeks. For longer storage, blanch and freeze or pickle whole fruits. Bonus: Sliced gourds last 3–5 days in the fridge—use them in stir-fries or soups!
Wrapping up and next steps
Growing ridge gourd in your compact garden is a rewarding journey that delivers fresh, nutritious produce year-round with minimal space! Whether you're a seasoned gardener or just starting, these planting hacks make it easier than ever to enjoy homegrown veggies. 🌱
Now that you’re armed with the right tips, take the next step—plant your first ridge gourd seeds or cuttings this week! Monitor your plants closely, and soon, you’ll be harvesting crisp, delicious gourds straight from your garden. Happy growing! 🌟