Pruning
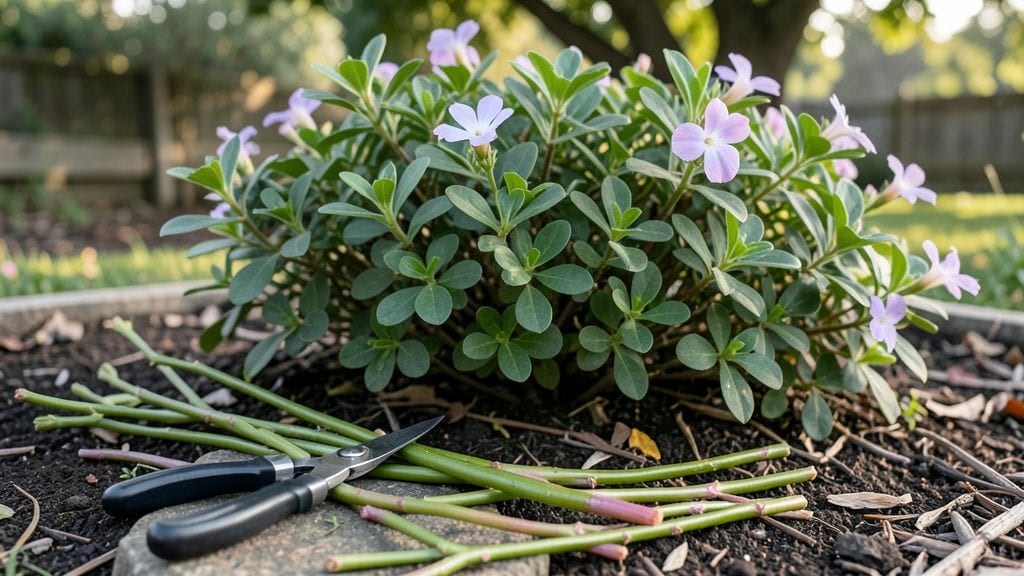
Pruning vinca plants transforms your tired, leggy mats into vibrant, bushy ground covers in just a few minutes. 🌿 I’ve watched my Vinca minor go from scraggly to showstopping after a single session—it’s that easy when you know the right cuts.
The secret lies in timing and technique, not brute force.
You only need three tools: sharp pruners (bypass for clean cuts), gloves (to avoid sap stains), and a bucket for clippings. The best time to prune is early spring, right before new growth starts, or after flowering if you want more blooms.
Avoid cutting into woody stems—they won’t regrow.
Start by removing dead or yellowed leaves, then trim back leggy stems to just above a leaf node. For a full rejuvenation, cut back one-third of the oldest growth to encourage fresh shoots. Within weeks, you’ll see dense, dark green foliage filling in gaps where bare soil once showed.
After pruning, water deeply to help recovery and apply a balanced fertilizer to support new growth. Mulch lightly to retain moisture, and avoid overwatering—vinca hates soggy roots. This method works for both Vinca minor and Vinca major, so you can use it for shady borders or sunny slopes alike.
📚 In This Guide
- What you need
- Instructions
- Tips and common mistakes
- Wrapping up and next steps
What you need
- ● Sharp bypass pruners – Choose a high-quality, stainless-steel pair (e.g., Felco or Fiskars) to make clean cuts without crushing stems. Size: 6-8 inches for medium-sized branches.
- ● Hand pruners (for small stems) – A compact, ergonomic pair (like Corona or Gonicc) for trimming thin, woody growth. Quantity: 1 pair.
- ● Disposable gloves – Nitrile or latex-free to protect your hands from thorns and sap. Quantity: 1-2 pairs.
- ● Disinfectant (70% isopropyl alcohol or bleach solution) – 1 part bleach to 9 parts water to sterilize tools between cuts and prevent disease spread.
- ● Garden twine or rubber bands – For temporarily securing branches if you’re doing heavy pruning. Quantity: Small roll or 3-5 bands.
- ● Trash bag or bucket – To collect pruned debris. Size: At least 5-gallon capacity.
- ○ Water spray bottle (optional but helpful) – For misting tools or plants if needed during hot weather.
- ● Loppers – If your vinca has thick, woody stems (uncommon but possible in older plants). Size: 16-24 inches.
- ● Pruning saw – For extremely thick branches (rare in vinca). Type: Curved blade for clean cuts.
- ● Plant food or fertilizer – A balanced, slow-release 10-10-10 or 20-20-20 formula to nourish vinca post-pruning. Quantity: Enough for your garden size.
- ● Mulch – Organic mulch (like shredded bark) to retain moisture and protect roots after pruning.
- ● Knee pad or stool – For comfort if you’re working in large garden beds or on the ground.
Instructions for pruning vinca plants to encourage new growth
Here's the straightforward approach I use to refresh vinca plants and trigger vigorous new shoots.
✂️ Step 1: Assess the Plant and Gather Your Tools
Start by examining your vinca closely for signs of dormancy—look for leggy stems, bare spots, or stems that have stopped producing leaves. You'll want to prune when the plant shows at least 3-4 inches of new growth after winter dormancy, which usually happens in early spring. Gather your sharp pruning shears and sterilized rubbing alcohol—I always wipe the blades between cuts to prevent spreading disease.
Wear gardening gloves to protect your hands from the plant's mild sap, which can irritate skin. This is the moment that matters: if you prune too early, you risk cutting back fresh growth; if you wait too long, the plant may become overgrown and unmanageable. Aim for the period when new shoots appear but haven't yet crowded the plant.
✂️ Step 2: Cut Back Leggy or Overgrown Stems
Begin by removing any stems that are long, bare, or woody at the base—these won't recover well. Make your first cut just above a set of leaves or a leaf node, angling the blade slightly downward to encourage water runoff. I like to cut back one-third of the plant's height at a time, which gives it enough energy to regenerate without shock. Avoid cutting into old, hardened wood; focus on the softer, green growth.
If the plant has become bushy but unruly, you can also thin out some of the oldest stems entirely. This opens up the center for airflow and sunlight, which prevents fungal issues and encourages new growth from the base. Watch for the plant's natural shape—vinca tends to grow in a rounded form, so aim to maintain that silhouette while removing only what's necessary.
✂️ Step 3: Shape the Plant for Balanced Growth
Now, step back and assess the plant's overall form. Vinca responds well to light shaping, so use your shears to trim any stems that are growing too long or out of place. Cut just above a leaf node or bud to encourage branching. For a fuller look, you can also pinch back the tips of some stems—this triggers the plant to produce side shoots, creating a denser, more compact plant.
Pay attention to the plant's natural growth habit: vinca often sprawls, so if you want a more upright form, focus your cuts on the lower stems to encourage upward growth. Avoid shearing the plant into a tight ball—this can lead to a woody center with little new growth. Instead, aim for a natural, open shape that allows sunlight to reach all parts of the plant.
💧 Step 4: Water and Fertilize After Pruning
Once you've finished pruning, water the plant deeply to help it recover from the stress of cutting. Vinca has moderate water needs, so aim to keep the soil evenly moist but not soggy. After pruning, you'll notice new shoots emerging within 2-3 weeks if the plant is healthy. To support this regrowth, apply a balanced, water-soluble fertilizer diluted to half strength. This gives the plant the nutrients it needs to bounce back quickly.
Real talk: if you see yellowing leaves after pruning, don't panic—it's often just the plant shedding old growth to make way for new. However, if the yellowing persists or spreads, check for overwatering or nutrient deficiencies. Vinca is tough, but it still needs the right conditions to thrive after a major pruning session.
Tips & tricks for perfectly pruned vinca plants
These simple yet transformative techniques will help you revive your vinca plants with confidence and precision.
The Timing Factor: I can't stress this enough—prune vinca when you spot 3-4 inches of fresh spring growth after dormancy. This is your plant's signal that it's ready to bounce back. Early spring is ideal, but if you miss the window, don't stress; vinca is forgiving. Just avoid pruning during extreme heat or cold—stick to mild days when temperatures hover between 55-75°F. This range gives your plant the best chance to recover quickly.
Cutting Technique That Changed Everything: When you make those one-third height cuts in Step 2, always angle your pruning shears slightly downward. This simple technique prevents water from pooling at the cut site, which drastically reduces the risk of fungal infections. I've seen too many well-intentioned gardeners skip this step and end up with rotten stems. Also, focus on cutting just above leaf nodes—this is where new growth will emerge most vigorously. Think of each cut as a signal to your plant: "Here's where I want you to grow next!"
Pruning Wisdom for Different Goals: Want a fuller vinca? In Step 3, pinch back the tips of some stems to encourage branching. For a more upright form, focus your cuts on the lower stems—this redirects energy upward. Here's what nobody tells you: vinca responds better to gradual shaping than drastic shearing. If your plant looks overgrown, spread the cuts over two sessions a week apart rather than removing everything at once. Your vinca will thank you with more robust regrowth.
Post-Pruning Care: That deep watering in Step 4 isn't just about hydration—it's about establishing moisture reserves for the new growth. After pruning, I like to add a thin layer of mulch around the base (not touching the stems) to help retain moisture and suppress weeds. The key is consistency: vinca needs evenly moist but not soggy soil during recovery. You'll know you're doing it right when you see those first fresh shoots in 2-3 weeks—that's your vinca's way of saying "thank you" for the refresh.
Pro Tips for Pruning Vinca Plants
- These simple yet transformative techniques will help you revive your vinca plants with confidence and precision.
- The Timing Factor: I can't stress this enough—prune vinca when you spot 3-4 inches of fresh spring growth after dorma...
- Cutting Technique That Changed Everything: When you make those one-third height cuts in Step 2, always angle your pru...
Frequently asked questions
Got questions about pruning vinca plants? You’re not alone! Here are answers to the most common concerns—so you can prune with confidence and keep your vincas thriving.
When is the best time to prune vinca plants?
The ideal time is late winter or early spring, just before new growth begins. This helps remove dead or weak stems and encourages fresh, vigorous blooms. Avoid pruning in fall—it can stimulate tender growth that won’t survive winter. For heavily overgrown vincas, you can also prune lightly in summer to shape them, but focus on spring for major revitalization.
How much can I cut back vinca plants without harming them?
Vinca plants are tough and resilient! You can safely cut back up to one-third of the plant’s height in a single pruning session. For severely leggy vincas, even deeper cuts (down to the base) work—just avoid over-pruning in one go. The plant will bounce back with new growth, so don’t be shy with the shears.
Do I need to fertilize after pruning vinca plants?
Yes! After pruning, vincas benefit from a balanced, slow-release fertilizer (like 10-10-10) to support new growth. Apply it lightly in early spring, following package instructions. Avoid heavy fertilizers right after a major prune—wait a week or two to let the plant recover first. For organic options, compost or fish emulsion works too!
Why are my vinca leaves turning yellow after pruning?
Yellowing leaves are usually normal and temporary—your vinca is redirecting energy to new growth. However, if the yellowing is widespread or paired with wilting, check for overwatering, pests (like spider mites), or root rot. Adjust watering habits (let soil dry slightly between waterings) and inspect the plant for signs of stress. Most vincas recover quickly once they’ve adjusted!
Can I propagate vinca cuttings from pruned stems?
Vinca cuttings root easily. After pruning, select healthy, 4-6 inch stems with a few leaves. Dip the cut end in rooting hormone (optional) and plant in moist potting mix. Keep the soil damp and place in bright, indirect light. Roots should form in 4-6 weeks. It’s a great way to expand your vinca collection for free!
Wrapping up and next steps
Pruning your vinca plants doesn’t have to be intimidating—just a few strategic cuts can transform them into lush, vibrant bloomers! 🌿 By removing dead stems, shaping for airflow, and encouraging new growth, you’re giving your vinca the fresh start it deserves.
Now that you’ve got the know-how, grab those shears and get pruning!
For even better results, keep an eye on your vinca’s progress and prune again in early spring to maintain its shape. Happy gardening—your plants will thank you with bold, beautiful blooms all season long! 🌸