Transplanting
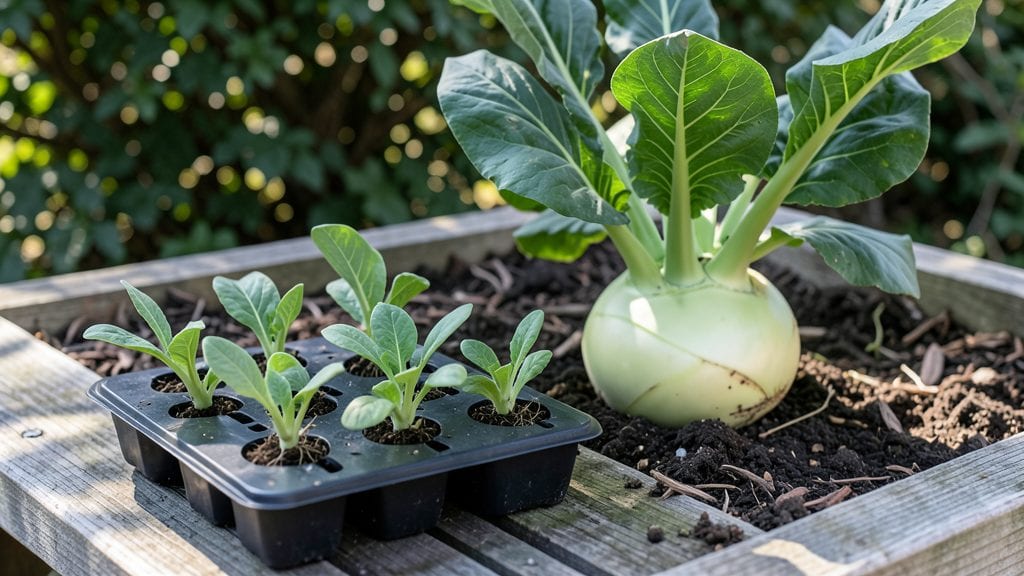
Planting kohlrabi seedlings the right way means the difference between sad, stunted plants and those bushy, crunchy harvests you’ll want to snack on straight from the garden. 🌱 I learned this after my first batch turned into leggy sticks instead of the plump bulbs I’d dreamed of—turns out, timing and soil matter more than I realized.
The secret isn’t complicated, but it’s easy to overlook details that make or break your crop.
You’ll need well-draining soil mixed with compost, a sunny spot with at least 6 hours of light daily, and a little patience for the first two weeks.
Kohlrabi seedlings hate transplant shock, so we’re planting them gently, spacing them 12-18 inches apart in rows 18 inches wide, and keeping the soil moist but not soggy. The key is getting them settled without stress—think of it like tucking them into bed after a long day.
Once planted, you’ll watch those first true leaves unfurl within 5-7 days, signaling they’ve taken root. Water at the base (not overhead) to prevent fungal issues, and mulch lightly to keep moisture steady.
By 4-6 weeks, you’ll start seeing those signature swollen stems—crunchy, sweet, and ready to harvest before they get woody. The earlier you handle them, the more tender they stay.
Here’s where it gets interesting—kohlrabi thrives in cooler weather, so if your spring warms up fast, focus on evening harvests or shade cloth. And if your seedlings look wilted after planting?
Don’t panic—it’s often just shock. A quick spray of water and a few days of shade will have them bouncing back. Let’s get those plants growing strong!
📚 In This Guide
- What you need
- Instructions
- Tips and common mistakes
- Wrapping up and next steps
What you need
- ● Kohlrabi seedlings: 6–12 healthy, 4–6 week-old plants (check for sturdy stems and vibrant leaves).
- ● Well-draining potting mix: 1–2 gallons (for transplanting seedlings before outdoor planting).
- ● Garden soil: Loamy, fertile soil with a pH of 6.0–7.0 (amend with compost if needed).
- ● Organic fertilizer: Balanced 10-10-10 or compost (1–2 cups per planting area).
- ● Garden trowel or transplanting spade (for digging holes).
- ● Watering can or hose with a gentle spray nozzle (avoid disturbing seedlings).
- ○ Gloves (optional but recommended for messy or thorny plants).
- ● Row marker or stakes (to mark planting rows, ~18–24 inches apart).
- ● Mulch (straw or shredded leaves) (1–2 inches thick to retain moisture).
- ● Sunlight: Full sun (6+ hours daily) or partial shade (4–6 hours).
- ● Spacing: 12–18 inches between plants in rows 2–3 feet apart.
- ● Weather: Wait until after the last frost when soil is at least 50°F (10°C).
- ● Water source: Consistent access to water for the first 2 weeks post-transplant.
- ● Epsom salt (1 tbsp per plant for magnesium boost).
- ● Row cover fabric (to protect seedlings from pests).
- ● Compost tea (for extra nutrients).
- ● Plant labels (to track varieties if growing multiple types).
Step-by-Step guide for planting kohlrabi seedlings
Here's how I get bushy, productive kohlrabi plants—no leggy stems or bitter bulbs.
🌱 Step 1: Prepare the Soil for Kohlrabi
Kohlrabi thrives in loose, fertile soil with excellent drainage. Work the 2 cubic feet of garden soil you've set aside to a depth of 12 inches, breaking up any clumps. I like to mix in 1 cup of compost per square foot—this gives the plants the nutrients they need for those sweet, crunchy bulbs.
Kohlrabi hates soggy roots, so if your soil drains poorly, add 1 gallon of coarse sand to the planting area. Test the soil by squeezing a handful—it should hold together loosely but not form a tight ball. The ideal texture is like a damp sponge that crumbles easily when touched.
🪴 Step 2: Space and Plant the Seedlings
Dig small holes just deep enough to cover the seedlings' roots completely, about 1 inch deeper than their current soil line. I space mine 12-18 inches apart in rows that are 24 inches apart—this gives them room to grow without crowding, which prevents those bulbs from turning tough or splitting.
Gently remove each seedling from its container, keeping the root ball intact. Place it in the hole at the same depth it grew in the pot, then fill around the roots with soil. Firm the soil lightly with your fingers to eliminate air pockets—this helps the roots establish contact immediately. Water each planted seedling with 1/2 cup of water to settle the soil.
☀️ Step 3: Provide Optimal Light and Water
Kohlrabi needs full sun—at least 6 hours daily—for those crisp bulbs. If your garden gets afternoon shade, choose a spot where the seedlings get morning sun instead. I always plant mine where they'll receive the most consistent light, even if it means moving them slightly after planting.
Keep the soil consistently moist but never soggy. Water deeply once per week unless it rains, aiming for 1 inch of water total. You'll know it's right when the top 1 inch of soil feels damp but not wet. Mulch around each plant with 1 inch of straw to retain moisture and keep weeds down—this also prevents the bulbs from turning bitter as they mature.
🌿 Step 4: Monitor Growth and Thin as Needed
Watch for the first true leaves to appear, which usually happens within 7-10 days. At this stage, the seedlings should look sturdy and upright. If any appear weak or yellowed, they might be struggling with transplant shock—give them a little extra water and a light dose of balanced fertilizer (like 10-10-10) diluted to half strength.
If you planted more seedlings than you need, thin to the strongest plants when they're 3-4 inches tall. Snip the weaker ones at the soil line with scissors—this prevents disturbing the roots of the plants you're keeping. Leave the strongest seedlings spaced 12 inches apart for optimal bulb development.
⏰ Step 5: Harvest at Peak Crispness
Kohlrabi bulbs are ready to harvest when they reach 2-3 inches in diameter—this is when they're sweetest and most tender. I check mine every 3-4 days starting about 4 weeks after planting. The bulbs should feel firm but yield slightly when pressed.
Use a sharp knife to cut the bulb cleanly from the stem, leaving the leaves intact. The leaves keep growing and producing for another 2-3 weeks, so you can harvest multiple times per plant. Store harvested bulbs in the fridge for up to 2 weeks—they'll keep their crisp texture if you eat them soon after picking.
Tips & tricks for perfect kohlrabi seedlings
Here's what nobody tells you about growing kohlrabi that'll make all the difference between a decent harvest and a truly exceptional one.
Soil Texture Secret: In Step 1, when you're preparing that 2 cubic feet of garden soil, don't just break up clumps—actually run your fingers through it. The soil should feel like a damp sponge that crumbles easily when squeezed. If it sticks together tightly, you need to add more of that 1 gallon of coarse sand. Kohlrabi roots need oxygen just as much as water, and compacted soil will make them struggle. I've seen plants wither because they couldn't breathe through the soil—don't make that mistake!
Thinning Technique: When you're thinning those seedlings in Step 4, don't just pull them out by hand—use clean scissors to snip at the soil line. This prevents disturbing the roots of your remaining plants, which can shock them and set back growth. I always keep a pair of small pruners handy for this exact purpose. Also, time your thinning for when seedlings are 3-4 inches tall—this gives them enough strength to recover quickly from the transplant shock of being crowded.
Harvesting Hack: That 2-3 inch diameter size mentioned in Step 5 is crucial—waiting longer makes bulbs tough and woody. But here's what nobody tells you: the best time to harvest is actually in the morning after a light dew. The bulbs will be crispest then, and you'll avoid the bitterness that can develop if they've been sitting in hot afternoon sun. I harvest mine right after breakfast when the garden is still cool.
Light Strategy: For the full sun—at least 6 hours daily requirement in Step 3, I've found that morning sun is actually more important than afternoon. If you must plant in partial shade, prioritize morning light over afternoon. Kohlrabi bulbs develop their sweetness through photosynthesis, and morning sunlight gives them the energy boost they need to start the day right. Also, if your garden gets intense afternoon sun, consider using shade cloth for the hottest hours—it prevents the bulbs from turning bitter.
Pro Tips for Planting Kohlrabi Seedlings
- Here's what nobody tells you about growing kohlrabi that'll make all the difference between a decent harvest and a truly exceptional one.
- Soil Texture Secret: In Step 1, when you're preparing that 2 cubic feet of garden soil, don't just break up clumps—actually run your fingers through it.
- Thinning Technique: When you're thinning those seedlings in Step 4, don't just pull them out by hand—use clean scissors to snip at the soil line.
Frequently asked questions
Got questions about planting kohlrabi seedlings? You’re not alone! Here are some of the most common concerns—and their straightforward answers—to help you grow a thriving harvest.
When is the best time to plant kohlrabi seedlings?
Kohlrabi thrives in cool weather, so aim to transplant seedlings 2–3 weeks before your last frost date in spring or 6–8 weeks before your first fall frost. Avoid extreme heat (above 75°F/24°C), as it can cause bolting. For extended harvests, stagger plantings every 2 weeks.
How long does it take for kohlrabi seedlings to mature after transplanting?
Count on 50–60 days from transplanting to harvest, depending on the variety. Smaller bulbs (like ‘Purple Vienna’) mature faster (45–50 days), while larger types (e.g., ‘White Vienna’) take longer. Check seed packets for exact timelines—harvest when bulbs are 2–3 inches wide for peak crunch!
What do I do if my kohlrabi seedlings look leggy or weak after transplanting?
Leggy seedlings often mean too much heat or shade. To revive them:
- Transplant on a cloudy day or in the late afternoon to reduce stress.
- Use shade cloth (30–50%) for the first week if temps exceed 80°F (27°C).
- Water deeply at the base (not overhead) to prevent fungal issues.
- Side-dress with compost or balanced fertilizer (10-10-10) to boost growth.
If they’re already bolting (flowering), switch to fast-maturing varieties like ‘Solar’ for future plantings.
Can I plant kohlrabi seedlings in containers or small spaces?
Kohlrabi is compact and perfect for containers. Use pots at least 6–8 inches deep and wide (one plant per container). For small gardens, space seedlings 6–8 inches apart in rows 18–24 inches apart. Just ensure they get full sun (6+ hours/day) and well-draining soil.
What pests or diseases should I watch for with kohlrabi seedlings?
Keep an eye out for:
- Cabbage worms: Handpick or use Bt (Bacillus thuringiensis) spray.
- Flea beetles: Cover seedlings with row fabric until established.
- Clubroot: Avoid planting in soil where brassicas (like cabbage) grew recently; amend soil with lime if needed.
- Powdery mildew: Improve airflow and water at the base to prevent fungal growth.
Rotate crops yearly to minimize issues!
Wrapping up and next steps
Planting kohlrabi seedlings is a rewarding way to grow a crisp, nutritious crop with minimal fuss! With the right soil, spacing, and care, you’ll soon enjoy homegrown harvests that rival store-bought—only fresher and more flavorful.
Whether you’re a beginner or a seasoned gardener, these direct-sowing secrets will help you cultivate bushy, crunchy kohlrabi like a pro. 🌱
Now that you’re armed with the know-how, roll up your sleeves and get planting! Start with just a few seedlings, experiment with varieties, and watch your garden thrive. Before you know it, you’ll be sharing your harvest with friends—or treating yourself to a delicious, homegrown snack. Happy growing! 🌟