Shrubs
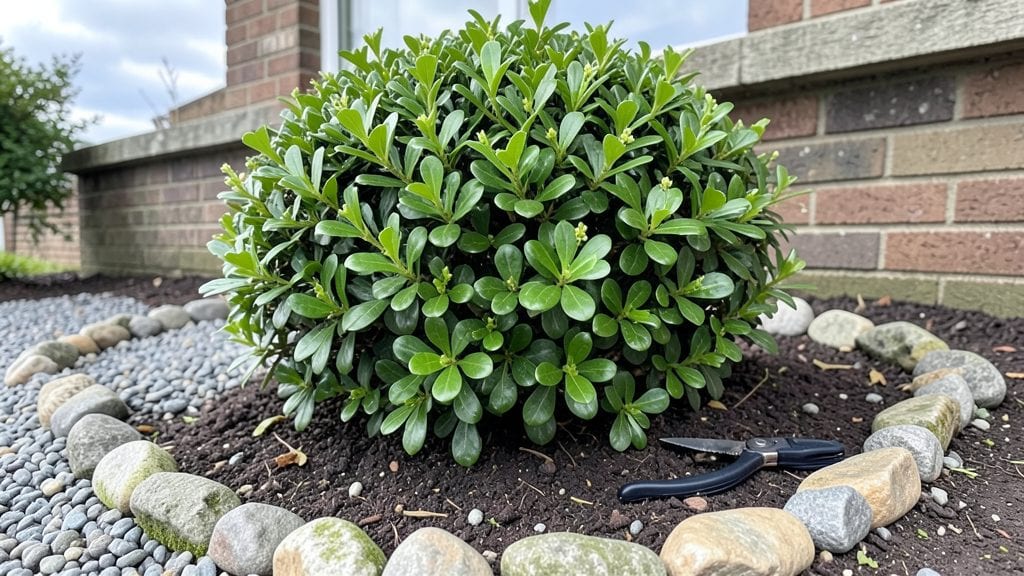
A boxwood foundation planting instantly elevates your home’s curb appeal while creating a structured privacy screen that stays lush year-round. I’ve used them to frame my front porch, and the difference in how neighbors admire my yard is night and day—especially when they’re manicured into clean, geometric shapes.
The key lies in spacing them just right (18–24 inches apart) and choosing varieties that match your climate, like 'Green Velvet' for cold zones or 'Winter Gem' for heat tolerance.
This isn’t just about looks—boxwoods act as a living barrier against noise and wind while keeping your foundation dry by redirecting rainwater. Start with well-draining soil (amend heavy clay with compost) and mulch to retain moisture.
Prune lightly in late spring to maintain shape, but avoid heavy cuts that stress the plants—think of it like giving them a haircut, not a buzz.
By summer, you’ll have a dense, evergreen hedge that feels like a built-in room divider, and in fall, the complementary plants (like ornamental grasses or pansies) will spill over for extra texture.
The best part? Once established, boxwoods need minimal care—just an annual trim and occasional fertilizer to keep them thriving.
Whether you’re framing a walkway or softening a stark foundation line, this design works for any home style. The secret is patience: it takes about 3–5 years for boxwoods to fill out completely, but the investment in long-term elegance is worth every minute.
Let’s get your foundation looking like the star of the neighborhood.
📚 In This Guide
- What you need
- Instructions
- Tips and common mistakes
- Wrapping up and next steps
What you need
- ● Boxwood plants: Quantity: 10–20 plants (depending on spacing—aim for 3–4 feet apart for mature size). Type: Buxus sempervirens (common boxwood) or Buxus ‘Green Velvet’ (dwarf variety for smaller foundations).
- ● Soil amendments: Compost or aged manure (2–3 cubic feet per plant). Slow-release fertilizer (e.g., 10-10-10, 1–2 lbs per 100 sq. ft.).
- ● Mulch: 3–4 inches of shredded bark or pine straw (to retain moisture and suppress weeds). Garden tools: Shovel or spade. Hoe or garden fork. Pruners (bypass pruners for clean cuts). Wheelbarrow (for hauling soil/amendments). Measuring tape or string line (to mark plant spacing).
- ○ Watering supplies: Hose with adjustable nozzle or watering can. Drip irrigation kit (optional but highly recommended for consistent moisture).
- ● Edging tools: Metal or plastic edging to define the planting bed neatly. Stakes or plant ties: For young boxwoods in windy areas (use biodegradable options). Decorative accents: Garden stones or pavers (to border the foundation). Low-growing perennials (e.g., heuchera or ajuga) for contrast.
Structured foundation planting with boxwoods: Step-by-Step layout and care
Here's the method I've used for decades to create clean, low-maintenance boxwood hedges that frame homes with precision.
Measure and Mark the Foundation Line
Start by measuring the length of your foundation where the boxwoods will run. Use a tape measure to mark every 6 inches along the base—this spacing ensures mature plants won't overcrowd. I drive small wooden stakes at each mark and stretch a mason's line between them for a perfectly straight guide. Boxwoods need 4-6 feet of horizontal space to mature without competing for nutrients, so adjust spacing if your foundation is wider than standard.
Check for utility lines before digging. Call 811 if you're unsure—hitting buried pipes or cables ruins a hedge before it starts. I always mark these with bright flags so I don't accidentally disturb them during planting. The line should run 12-18 inches away from the house foundation to prevent moisture wicking that could damage siding.
Dig Planting Trench and Amend Soil
Dig a trench along your marked line that's 12 inches wide and 18 inches deep. The extra depth accommodates root balls and allows room for backfilling with amended soil. I use a shovel to loosen the bottom 6 inches of the trench—boxwoods hate compacted soil, and this prevents root restriction as they establish.
Remove any rocks or debris, then mix 2 parts native soil with 1 part compost and 1 part perlite for each planting hole. Boxwoods prefer slightly acidic, well-draining soil, so add 1 cup of sulfur per 5 gallons of mix if your soil tests above 6.5 pH. Test your soil first—amending after planting is far more difficult. The trench should have enough amended mix to backfill to 2 inches below the top of the root ball when planted.
Plant Boxwoods at Uniform Depth
Place each boxwood in the trench so the top of its root ball sits 1 inch below the surrounding soil grade. This prevents crown rot from sitting water while ensuring roots have access to moisture. I space plants 4 feet apart for a standard hedge—closer if you want a denser screen, wider for a more formal look. Tap the soil gently around the root ball to eliminate air pockets, then water deeply to settle everything.
Don't bury the plant deeper than recommended—boxwoods are sensitive to suffocation. If the root flare (where roots meet the trunk) sits below soil level, the plant will struggle to breathe and may decline. After planting, add 2 inches of mulch (but keep it 3 inches away from the trunk) to retain moisture and suppress weeds. Use pine bark or shredded hardwood—never dyed mulch, which can harm roots.
Stake and Water for Establishment
Install 2-foot bamboo stakes on either side of each boxwood and secure with soft fabric ties—never wire, which can girdle the trunk. This supports young plants during their first growing season when roots are shallow. Water immediately after staking to help soil settle around the roots, then maintain 1 inch of water per week during the first year. Boxwoods are drought-tolerant once established, but young plants need consistent moisture.
Check soil moisture weekly by pressing your finger 2 inches deep—if it feels dry, water slowly at the base. Avoid overhead watering, which can spread disease. After 6-8 weeks, you'll see new growth at the tips—this is your signal the roots have anchored. Remove stakes once plants are sturdy enough to stand without support, usually by the second growing season.
Prune and Maintain for Year-Round Shape
Prune boxwoods twice yearly: a light shaping in late spring after new growth appears, and a clean-up trim in early fall before dormancy. Use sharp, clean shears and cut just above a leaf bud or branch junction—never leave stubs. I shape hedges with a handheld hedge trimmer for precision, then finish with shears for details. Avoid cutting into old wood, which won't regrow.
Fertilize in early spring with a slow-release, balanced 10-10-10 formula applied at ½ pound per 100 square feet. Boxwoods don't need much—over-fertilizing leads to weak growth and pest issues. Watch for boxwood blight (dark spots on leaves) or spider mites (fine webbing), which thrive in dry conditions. Treat early with neem oil or fungicide as needed, but prevention through proper watering and spacing keeps problems minimal.
Tips & tricks for perfect boxwood foundation planting
A few strategic adjustments can transform your boxwood foundation planting from good to exceptional. These are the lessons I've learned after decades of shaping hedges that stand the test of time.
Precision in Step 1 Pays Off: When marking your 6-inch intervals in Step 1, use a level to ensure your mason's line stays perfectly horizontal. I've seen too many hedges grow uneven because the initial line wasn't level—this creates a wave effect that's nearly impossible to correct later. Also consider using a laser level for longer foundations; the extra $20 rental prevents hours of frustration adjusting stakes later.
Soil Amendment is Non-Negotiable: The 2:1:1 soil mix in Step 2 (native soil, compost, perlite) is critical, but don't skimp on the sulfur adjustment if your soil tests above 6.5 pH. I've seen boxwoods yellow and decline within months when planted in alkaline soil without proper amendment. Test your soil before planting—most garden centers offer quick tests for under $10. The perlite isn't just filler; it creates those tiny air pockets boxwood roots crave.
Planting Depth Determines Survival: That 1-inch below soil grade in Step 3 is more important than most realize. I've had clients bury plants too deep, and within two years those boxwoods developed crown rot from sitting water. Use a small marker on your shovel to check depth as you backfill. For extra insurance, add a thin layer of coarse sand at the bottom of the trench before planting—this improves drainage without affecting the soil structure.
Watering Strategy Prevents Common Failures: The 1-inch weekly watering guideline in Step 4 works, but timing matters more than quantity. Water in the morning so foliage dries by evening—this prevents fungal diseases that thrive in damp conditions. I've seen entire hedges develop boxwood blight because of evening watering. Also, consider installing a drip irrigation system along your planting line; it delivers water directly to roots without wetting leaves, and you can set it on a timer for consistent moisture.
Pro Tips for Boxwood Foundation Planting
- A few strategic adjustments can transform your boxwood foundation planting from good to exceptional.
- Precision in Step 1 Pays Off: When marking your 6-inch intervals in Step 1, use a level to ensure your mason's line stays perfectly horizontal.
- Soil Amendment is Non-Negotiable: The 2:1:1 soil mix in Step 2 (native soil, compost, perlite) is critical, but don't skimp on the sulfur adjustment if your soil tests above 6.5 pH.
Frequently asked questions
Got questions about creating a stunning boxwood foundation planting?
You’re not alone! Here are some of the most common concerns—and their straightforward answers—to help you plan with confidence.
What’s the best time of year to plant boxwoods for a foundation?
Plant boxwoods in early spring or fall when temperatures are mild (50–70°F). Avoid extreme heat or frost, as these can stress young roots. Spring planting gives them time to establish before summer, while fall offers cooler soil and reduced competition for water.
How far from the house should I plant boxwoods for a foundation?
Keep boxwoods 1–3 feet away from siding, depending on their mature size. Dwarf varieties (like ‘Green Velvet’) can be planted closer (12–18 inches), while larger types (e.g., ‘American Holly’) need at least 2–3 feet. This spacing prevents moisture damage and allows airflow.
Do boxwoods need special care after planting near a foundation?
Yes! Water deeply 2–3 times per week for the first month, then taper to weekly. Mulch with 2–3 inches of organic material (like shredded bark) to retain moisture and regulate soil temperature. Avoid piling mulch against the trunk to prevent rot.
Are there alternatives to boxwoods for a foundation planting?
Consider holly, juniper, or dwarf yew for similar structure and year-round appeal. Holly offers glossy leaves and berries, while juniper thrives in drier climates. Just ensure your choice matches your climate zone and sunlight needs.
Why are my boxwoods turning brown or dying after planting?
Brown leaves often signal overwatering, underwatering, or fungal issues. Check soil moisture (it should be damp but not soggy) and improve drainage if needed. If spots appear, treat with a fungicide like neem oil and prune affected areas. Avoid pruning in late summer, as this can stress plants.
Wrapping up and next steps
Creating a boxwood foundation planting is a fantastic way to add structure, privacy, and timeless beauty to your home’s exterior. 🌿 With their evergreen foliage, neat growth, and low-maintenance charm, boxwoods offer year-round elegance while requiring minimal effort once established.
Whether you’re a seasoned gardener or just starting, this project is well within reach—and the results will leave your curb appeal unmatched.
Ready to transform your space? Start by sketching your design, gathering supplies, and planting with confidence. Before you know it, your foundation will feel like a polished, green masterpiece! 🌟